About Me

My photo
muffins, unlike humans, will never let you down.

Saturday, January 28, 2012

Hi world! Yes, one person who reads this blog. You are the world to me, and I hope that's okay. Anyway, had access to a camera this weekend and had an itch to bake, so here it is - chocolate chip banana bread! This one is a bit different from the ones I have made in the pat because it include sour cream and honey. It has quite a sweet tang to it, and is really moist (i think everyone hates the word moist, but alas).


Chocolate Chip Banana Loaf

Recipe adapted from The Sweet Spot and Jun-Blog

1/3 cup unsalted butter, at room temperature, plus more for greasing the pan
1 cup all-purpose flour
1 teaspoon baking powder
1 teaspoon baking soda
1/4 cup honey
1/2 cup packed light brown sugar
1/2 teaspoon ground cinnamon
1/2 teaspoon salt
1 cup roughly mashed ripe bananas (about 3)
1/2 teaspoon vanilla extract
1 large egg
1/2 cup plain sour cream (plain yogurt would work too, or sweetened yogurt but you might want to reduce the brown sugar a bit)
1 cup semisweet chocolate chips, mandatory

Preheat the oven to 350 degrees F. Lightly butter an 8-1/2 x 4-1/2-inch loaf pan and set aside.

Sift together the flour, baking powder, and baking soda and set aside.

Put the butter, honey, sugar, cinnamon, and salt in the bowl of an electric mixer fitted with paddle attachment. Beat on medium-high speed until light and fluffy, about 5 minutes. Scrape down the sides and bottom of the bowl, add the bananas and vanilla, and beat on medium speed until the mixture looks “broken,” or lumpy, about 1 minute. The bananas should be smashed, with a few chunks remaining.

Turn the speed to medium-low and beat in the egg until incorporated. Turn the speed to low and gradually add the shifted flour mixture, mixing just until no traces of flour remain, about 10 seconds. Add the yogurt and mix until the batter has only a few remaining white streaks, about 5 seconds. Be sure to avoid overmixing. Gently fold in the chocolate chips, if desired.

Transfer the batter to the greased pan. Bake in the center of the oven until a tester inserted in the center comes out clean, about 55 minutes. Cool the cake in the pan on a rack for 15 minutes, then unmold and cool completely on the rack. Consume!

Tuesday, May 24, 2011

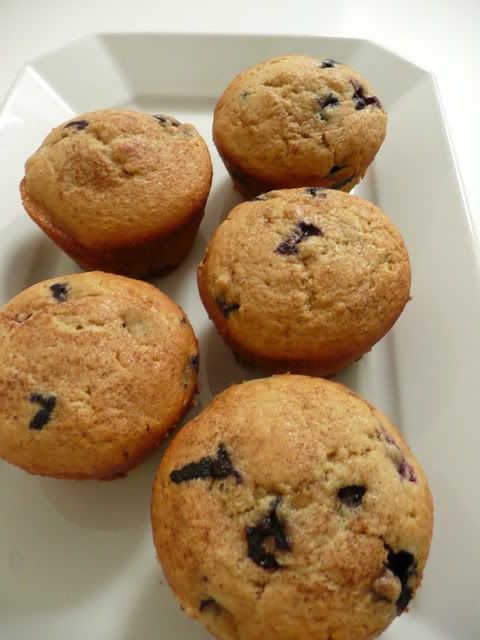
blueberry coffee cake muffins


Why is this lighting so hideous? Why do i take such bad pictures? WHY IS THIS BLOG SO TERRIBLE?

I swear they are delicious, but I must admit they look a little sad.

This is a tweaked barefoot contessa recipe (while it's true that ina garten can do no wrong, I was feeling defiant):

12 tablespoons unsalted butter, room temperature

· 1 cup white sugar

· 1/2 cup brown sugar

· 1 teaspoon cinnamon

· 3 eggs, at room temperature

· 1 1/2 teaspoons vanilla extract

· 8 ounces (about 1 cup) sour cream

· 1/3 cup milk

· 2 1/2 cups all-purpose flour

· 2 teaspoons baking powder

· 1/2 teaspoon baking soda

· 1/2 teaspoon salt

2 2 cups blueberries (dust the blueberries with flour before you put them in the batter so that they don't all sink to the bottom of the muffin when baking. Someone fill me in on the science behind this magical trick).

Set your oven to 350 and grease or line muffin pans. This recipe makes about twelve big ones.

Use an electric mixer to cream the sugar and the butter until it is light and fluffy (around five minutes). Put the mixer on its lowest speed and add in the eggs one at a time. Add the vanilla,sour cream, and milk.

In a separate bowl, sift together the flour, baking powder, baking soda, cinnamon, and salt. Add the flour mixture to the batter and beat until just mixed (overmixing will make the texture of the cooked muffin too dense). Fold in the blueberries with a spatula and scoop the batter into the muffin cups, filling each just over the top.

Bake for 25 to 30 minutes, until the muffins are lightly browned on top and a cake tester (lets be real and call it a toothpick) comes out clean.

PS: Isn't centering all the font just so poetic and pleasing to the eyes? It's quite charming, I know! Not really, blogger is just being weird. technology is still confusing. Oh, how i miss those geocities days.


Friday, May 6, 2011

chocolate peanut butter truffles

Dear reader(s),

Sorry I have abandoned you for so long. But here are truffles!


Chocolate Peanut Butter Truffles:

3/4 cups peanut butter (crunchy or smooth)
1/4 cup softened butter
1/2 teaspoon vanilla extract
1 cup confectioners sugar
1/2 cup brown sugar

Put in a bowl and mix these things until you form a dough. Roll into about two inch thick balls and stick toothpicks in them. Place in the freezer on wax paper for half an hour or until firm.

While they are in the freezer, melt down any chocolate you please. I used about 6 ounces but play it by ear. I think that peanut butter part is kind of sweet, so I used a semi sweet chocolate for most of them to balance it out. I also threw in some chopped pecans, so now i can be fancy and call these chocolate peanut pecan truffles. Extra syllables lead to fanciness (so does the word artisan in front of any title, which both sounds fancy and makes sloppy work seem deliberate! hooray for words). It is not my fault if you end up sounding pretentious and your food tastes horrible, though, so be warned.

Dip the balls into the chocolate and place back onto the wax paper. Decorate in any way you see fit. I melted down white chocolate for most and did a drizzle (two have cocoa powder on them and two have mini chocolate drops on them). Sprinkles or nuts would work as well. Place in the freezer again for a quick set or just leave out until the chocolate hardens (it does not take long).

Consume!

Tuesday, December 29, 2009

pumpkin chocolate brownies!

So, my mom came home the other day excitedly carrying a can of pumpkin from the supermarket exclaiming that i would be able to make pumpkin dessert soon. I looked at her strangely at first for the suggestion--I, like so many others, had fallen under society's treacherous lie that pumpkin is a fall item. Thankfully, though, i rethought it, and decided that i would break these oddly constructed barriers, and use this pumpkin with the full enthusiasm that it clearly deserves..and here is the result! Pumpkin chocolate layered brownies. They make me scoff in disbelief at my former notions of pumpkin as fall fare. These brownies have so much texture--the cakey pumpkin layer and the fudgey chocolate layer are sinfully synergistic. I promise you won't be disappointed.


Pumpkin Chocolate Brownies (adapted from Martha Stewart)
makes around 10 generous servings

8 tablespoons (1 stick) butter
6 ounces semisweet chocolate chips
2 cups AP flour
1 teaspoon baking powder
1/2 teaspoon salt
1 3/4 cups sugar
1 tablespoon vanilla extract
4 eggs
1 1/4 cups pumpkin
1/4 cup canola oil
1 teaspoon cinnamon
1/2 teaspoon all-spice

Preheat oven to 350 degrees and grease a nine inch square baking dish (I only had an eight inch on hand, so i baked them 10-15 minues more). Melt the butter and chocolate in the microwave or in a bowl over simmering water, stirring until smooth. Mix flour, baking powder, and salt and set aside. Beat the sugar, vanilla, and eggs with an electric mixer until fluffy (about 4 to 5 minutes), and then gradually beat in the dry mix.

Divide the batter into two bowls. Add the pumpkin, oil, and spice to one and add the melted chocolate to the other. Pour half of the chocolate batter into the baking dish, then pour half of the pumpkin batter in. Repeat. Make sure your layers are even (use a spatula to do this), but don't worry about perfection--the chocolate batter is thicker and harder to spread evenly.
Bake for 40 to 45 minutes until a toothpick inserted comes out clean.

Let cool for 10 minutes (admittedly, i couldn't wait to cut them so i cannot verify the optimal time). While cooling, grab a handful of chocolate chips and melt them in the microwave. Take a plastic bag and cut a small hole at the tip (or, if you have actual baker tips, fee free to use those), then put the melted chocolate in it. Once the brownies are cut, make chocolate designs on top! If desired, sprinkle some chopped nuts (I used chopped peanut brittle) on them. Enjoy and devour!
Hello world! So, this is a baking blog. Yes, I know, it is a terribly original concept! I just don't know how i think such things up.

Anyway, to introduce myself--I am basically just a person who likes to bake, and hope that you will find some delicious recipes on this site and visit even if there are about 39498449 other ones just like it on the web. I don't claim to be special, but i am quite devoted to the pleasure of your tastebuds.